This article I will give some steps on how to setup Elasticsearch from localhost (MacOS using multipass) that connects to an LB server using reverse proxy then connects to an LXD server that connects to its containers. This is what it looks like:
master1.elk domain —> LB server get’s the server/domain name —> Forward the request to LXD server on a specific port —> LXD detects the incoming port using iptables then forwards the traffic to an LXC container.
data-1.elk domain —> LB server get’s the server/domain name —> Forward the request to LXD server on a specific port —> LXD detects the incoming port using iptables then forwards the traffic to an LXC container.
data-2.elk domain —> LB server get’s the server/domain name —> Forward the request to LXD server on a specific port —> LXD detects the incoming port using iptables then forwards the traffic to an LXC container.
Local machine (MacOS) hostfile and setup multipass Ubuntu container
Below shows the IP address of our LB server so we can use domains from the hosts file
21:39:12:~ % grep "master.elk" /private/etc/hosts
192.168.50.27 master.elk data-1.elk data-2.elk
Below shows how I created an Ubuntu 4GB memory and 15GB (10GB is not enough if you install Kibana) disk machine using multipass
multipass launch -nelk --network=en0 --disk=15g --mem=4g
LB Server:
We set up a reverse proxy from a user browser connecting to the load balancer server then LB connects to the LXD server on a specific port.
User access the site —> LB nginx reverse proxy connects to an LXD server with a specific port —> LXD route the connection to a specific container LXD using iptables (redirect a specific incoming port to a specific LXC container)
root@lb:/etc/nginx/sites-enabled# ll
total 8
drwxr-xr-x 2 root root 4096 Jul 10 12:52 ./
drwxr-xr-x 8 root root 4096 Apr 24 06:59 ../
lrwxrwxrwx 1 root root   37 Jul  6 21:08 data-1.elk -> /etc/nginx/sites-available/data-1.elk
lrwxrwxrwx 1 root root   37 Jul  6 21:08 data-2.elk -> /etc/nginx/sites-available/data-2.elk
lrwxrwxrwx 1 root root   34 Apr 24 06:59 default -> /etc/nginx/sites-available/default
This is what the nginx config looks like for a specific site configuration.
Site domain name: data-1.elk
server {
        listen  80;
        server_name     data-1.elk;
        location / {
                 proxy_pass https://192.168.50.54:9999;
		 proxy_set_header Host data-1.elk;
        }
}
And for the others:
root@lb:/etc/nginx/sites-enabled# cat data-2.elk
server {
        listen  80;
        server_name     data-2.elk;
        location / {
                 proxy_pass https://192.168.50.54:9998;
		 proxy_set_header Host data-2.elk;
        }
}

root@lb:/etc/nginx/sites-enabled# cat master.elk
server {
        listen  80;
        server_name     master.elk;
        location / {
                 proxy_pass https://192.168.50.54:9997;
		 proxy_set_header Host master.elk;
        }
}
LXD Server:
List of containers inside LXD. Those containers are Centos 7 amd64
root@elk:~# lxc list
+----------+---------+-----------------------+----------------------------------------------+-----------+-----------+
|   NAME   |  STATE  |         IPV4          |                     IPV6                     |   TYPE    | SNAPSHOTS |
+----------+---------+-----------------------+----------------------------------------------+-----------+-----------+
| data-1   | RUNNING | 10.165.227.224 (eth0) | fd42:ce6a:15be:981:216:3eff:fe77:6a6d (eth0) | CONTAINER | 0         |
+----------+---------+-----------------------+----------------------------------------------+-----------+-----------+
| data-2   | RUNNING | 10.165.227.196 (eth0) | fd42:ce6a:15be:981:216:3eff:fe0f:ce88 (eth0) | CONTAINER | 0         |
+----------+---------+-----------------------+----------------------------------------------+-----------+-----------+
| master-1 | RUNNING | 10.165.227.143 (eth0) | fd42:ce6a:15be:981:216:3eff:fef6:c00d (eth0) | CONTAINER | 0         |
+----------+---------+-----------------------+----------------------------------------------+-----------+-----------+
You need to make sure that IPtables are loaded after the reboot of LXD server. So that LXC containers will be accessible via browser outside multipass.
sudo apt-get install iptables-persistentThen load the iptables
iptables -A PREROUTING -t nat -p tcp --dport 9999 -j DNAT --to 10.165.227.224:9200
iptables -A PREROUTING -t nat -p tcp --dport 9998 -j DNAT --to 10.165.227.196:920
iptables -A PREROUTING -t nat -p tcp --dport 9997 -j DNAT --to 10.165.227.143:9200
To make sure that Elasticsearch will start automatically during boot from the CentOS container:
sudo /sbin/chkconfig --add elasticsearch
sudo service elasticsearch start
To make sure that IPtables rules are loaded after boot from the LXD matching:
LXC Elasticsearch containers
Container: master-1
Download and install Elasticsearch:
wget https://artifacts.elastic.co/downloads/elasticsearch/elasticsearch-7.13.3-x86_64.rpm
wget https://artifacts.elastic.co/downloads/elasticsearch/elasticsearch-7.13.3-x86_64.rpm.sha512
shasum -a 512 -c elasticsearch-7.13.3-x86_64.rpm.sha512
sudo rpm --install elasticsearch-7.13.3-x86_64.rpm
The code below is the elasticsearch.yml file of master-1
elasticsearch.yml
IMPORTANT!
Before you proceed below, make sure master and node/s are visible. Locate the elasticsearch.yml file and change this from ‘true’ to ‘false’
xpack.security.enabled: true
restart elasticsearch then test the connection of master and nodes. Run the command below from the master node.
curl localhost:9200/_cat/nodesThen you will see this:
192.168.64.11 61 92 7 0.04 0.26 0.24 cdfhrstw - node-1
192.168.64.9  46 76 7 0.02 0.22 0.23 imr      * master-1
So you can proceed with the steps below because the above shows master and node can communicate with each other.
Setup a certificate with a password to secure the elasticsearch connectivity and so no one can get in to your ES cluster.
Create a certificate with the following steps:
Create ‘certs‘ folder:
mkdir /etc/elasticsearch/certsPut the self-signed certificate inside that folder.
Then use the binary ES tool: elasticsearch-certutil
/usr/share/elasticsearch/bin/elasticsearch-certutil cert --name playground --out /etc/elasticsearch/certs/playgroundEncrypt the cluster network.
Then just leave the password empty (this is just a basic setup so no need to set up a password so no need for us to save in elasticsearch key store).
[root@master-1 ~]# ll /etc/elasticsearch/certs/
total 4
-rw-r----- 1 root elasticsearch 3600 Jul 10 02:51 playground
So you see it created a certificate file playground.
Copy that playground file to other containers data-1 and data-2 like using scp.
scp playground 10.165.227.224:/tmp
scp playground 10.165.227.196:/tmp
Then SSH to each of the containers data-1 and data-2 to transfer the certificate and setup the correct file permission (to make sure elasticsearch group can read the file).
mkdir /etc/elasticsearch/certs
cp /tmp/playground /etc/elasticsearch/certs/
chmod 650 /etc/elasticsearch/certs/playground
Do that for both containers and we are done generating certificates.
Now we configuration to make sure all nodes will use the same certificate.
Let’s configure ES to enable transport network encryption, user authentication and give path to cert to encrypt it.
Edit the /etc/elasticsearch/elasticsearch.yml and add the codes below at the very bottom of the file.
## -- security --
#
xpack.security.enabled: true
xpack.security.transport.ssl.enabled: true
xpack.security.transport.ssl.verification_mode: certificate
xpack.security.transport.ssl.keystore.path: certs/playground
xpack.security.transport.ssl.truststore.path: certs/playground
Make sure to apply/add those config codes to each nodes: data-1 and data-2 then restart ALL nodes.
systemctl restart elasticsearchSetup a password using ES utility: elasticsearch-setup-passwords (apply only in master node)
/usr/share/elasticsearch/bin/elasticsearch-setup-passwords interactiveThen go-ahead to enter your custom password. You can use the same password for all if you want.
Running Elasticsearch with systemd
To configure Elasticsearch to start automatically when the system boots up, run the following commands:
sudo /bin/systemctl daemon-reload
sudo /bin/systemctl enable elasticsearch.service
Start Elasticsearch
sudo systemctl start elasticsearch.serviceLet’s test it! (enter your password).
[root@master-1 certs]# curl localhost:9200/_cat/nodes?v
{"error":{"root_cause":[{"type":"security_exception","reason":"missing authentication credentials for REST request [/_cat/nodes?v]","header":{"WWW-Authenticate":"Basic realm="security" charset="UTF-8""}}],"type":"security_exception","reason":"missing authentication credentials for REST request [/_cat/nodes?v]","header":{"WWW-Authenticate":"Basic realm="security" charset="UTF-8""}},"status":401}
You see that above shows an error 401 where we cannot access the cluster because it requires an authentication. So it is secured!
Below shows we use the user “-u elastic” then we entered our password then we are now able to view and access our cluster/nodes.
[root@master-1 certs]# curl localhost:9200/_cat/nodes?v -u elastic
Enter host password for user 'elastic':
ip            heap.percent ram.percent cpu load_1m load_5m load_15m node.role master name
10.73.174.25            52          28  11    0.61    0.75     0.66 imr       *      master-1
10.73.174.83            61          14  15    0.61    0.75     0.66 cdfhrstw  -      data-2
10.73.174.187           66          14  11    0.61    0.75     0.66 cdfhrstw  -      data-1
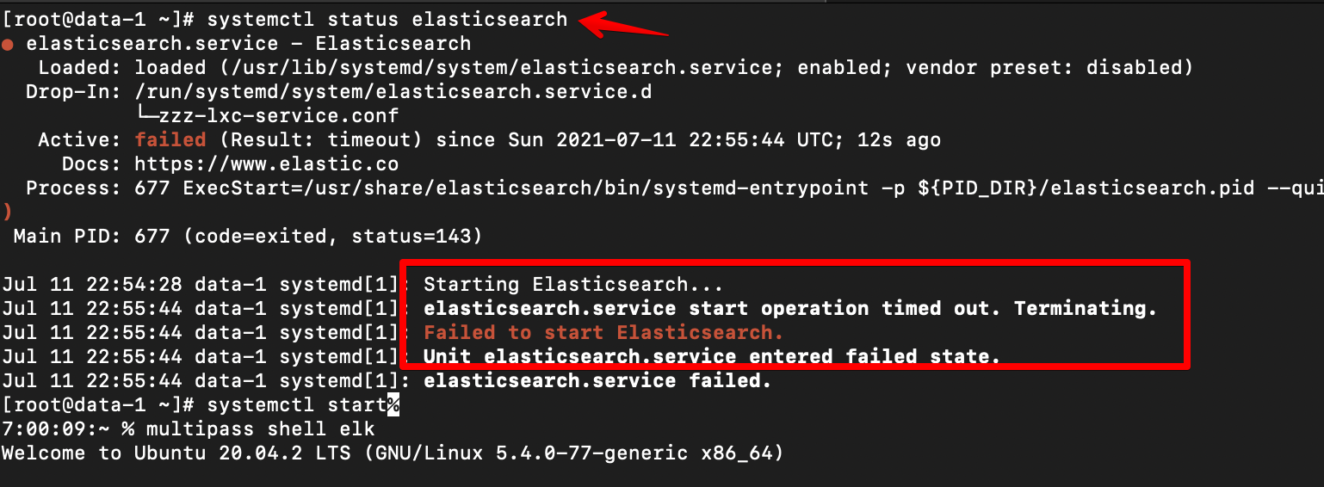
IMPORTANT! How to resolve timeout issue (most likey in localhost if resources are not enough like RAM and Disk Space)

Follow the steps below to resolve this:
Inspect default timeout for start operation. Below shows it 1min and 30s. It times out on my end because I am just using localhost MacOS multipass and resoerces are not enough.
$ sudo systemctl show elasticsearch | grep ^Timeout
TimeoutStartUSec=1min 30s
TimeoutStopUSec=infinity
Elasticsearch service will be terminated if it cannot start in 1min and 30 seconds (by default).
So to fix that, follow below.
Create a service drop-in configuration directory.
sudo mkdir /etc/systemd/system/elasticsearch.service.dDefine TimeoutStartSec option to increase startup timeout.
echo -e "[Service]nTimeoutStartSec=180" | sudo tee /etc/systemd/system/elasticsearch.service.d/startup-timeout.conf [Service] TimeoutStartSec=180Reload systemd manager configuration.
sudo systemctl daemon-reload
Inspect altered timeout for start operation.
sudo systemctl show elasticsearch | grep ^Timeout

TimeoutStartUSec=3min
TimeoutStopUSec=infinity
Start the Elasticsearch service.
sudo systemctl start elasticsearchTo test, restart LXD or Multipass.
Container: Data-1
The code below is the elasticsearch.yml configuration for Data-1 node:
elasticsearch.yml
You can follow and edit the codes above if you want more nodes like data-2, etc.
Results:
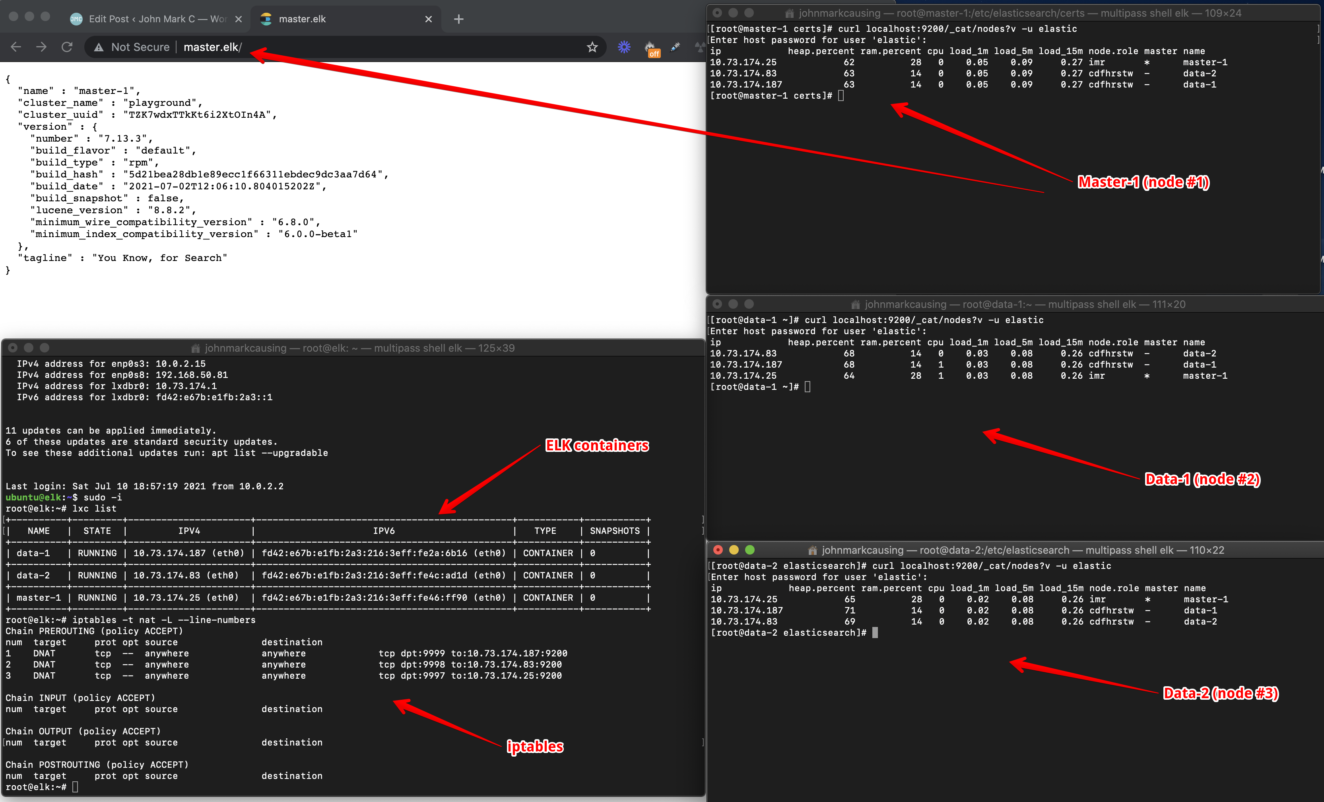
Below is the outcome where we can connect to our elasticsearch cluster: master-1, data-1 and data-2 from our local machine using domain names master.elk, data-1.elk and data-2.elk
